Thursday, June 26, 2014

Viewing the source code of the steps recorded using Selenium IDE in our desired language

While working with Selenium 2 in future,we've to know how to write automation scripts by hand i.e. without recording . For example if you want to know how to write automation script for 'typing text into the search text box in Google Page' user action. But you don't know the Selenium command which types text into the text box. Lets find out the command using Selenium IDE Recording feature and use it in Selenium 2 in future.

1. Launch Selenium IDE from Firefox Browser -> Tools Menu
2. Ensure that the Selenium IDE is launched and Record button is enabled by default
3. Type www.google.com in the Firefox Browser -> Address bar and Press Enter key on the keyboard
4. In Google page, Type 'Selenium-automation-by-arun' text in the search box and click on 'Google Search' button
5. Click on 'Record' button to stop recording and ensure that the following commands are displayed under the Selenium IDE -> Table tab as shown below:


6. Now lets see the source code of the above recorded steps by following the next steps.
7. Maximize the 'Selenium IDE' and click on 'Source' Tab as shown below:


8. Observe that source code is displayed in HTML format as shown below:


9. For example I'm writing automation scripts in Selenium 2 in Java language, but how can this HTML code help me in understand the Selenium Command to be written in java language. It doesn't help, instead we've to view the source code in Java language. Follow the next steps to view the source code in Java language.

10. Select 'Options' option from the Selenium IDE -> Options Menu -> Options as shown below:


11. Ensure that 'Selenium IDE Options' pane is displayed and select the 'Enable experimental features' check box option to enable as shown below:
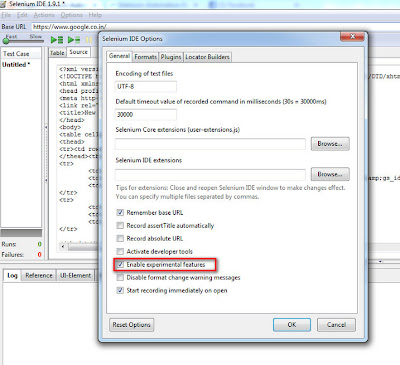

12. Click on 'OK' button on the 'Selenium IDE Options' to save the changes made to the options

13. Select 'Java/Junit4/WebDriver' option from the Selenium IDE -> Options Menu -> Format as shown below:

14. Read the text on the Confirmation dialog and click on 'OK' button as shown below:


15. Ensure the code displayed under the 'Source' tab is now changed to Java as shown below:


16. Search for 'selenium-automation-by-arun' text in the Java source code to identify the line which has   text typing command. I've identified this text in the Java source code as shown below:


17. In the above identified line, I have identified that '.sendkeys' is the command to be used in order to type text into the text box using selenium as shown below. So now I can use this command '.sendKeys' if it is required any where while writing automation scripts without recording using Selenium 2.... :)


18. So, by following the above steps you can learn selenium commands which are required to perform various User Actions like typing text into the text box etc.

19. After you finish viewing the source code in Java, please switch back the language format from Java to HTML. Until and unless you change the language format again to HTML, Recording options wont work and also 'Table' tab wont be clickable. (So click on Selenium IDE -> Options Menu  -> Format -> HTML option  to switchback to HTML)

Wednesday, June 25, 2014

Record and Playback using Selenium IDE

Recording Process:

1. Launch Firefox and open Selenium IDE from Tools Menu as shown below:


2. Ensure that the Selenium IDE is launched as shown below:


3. After the Selenium IDE is launched, ensure that the Recording Button is turned on by default. (i.e. Selenium IDE is in recording mode by default on launching) as shown below:


4. While the recording button is enabled, open any website say www.google.com in the Firefox browser as shown below:


5. In the 'Google' page, click on 'I am feeling lucky' button as shown below:

6. Turnoff the 'Recording' button on the Selenium IDE to stop recording as shown below:


7. Ensure that the recorded commands are displayed under the table tab as shown below:


Playback Process:

8. Open any other site say www.yahoo.com in the Firefox browser and Click on the 'Play current test case' button on the Selenium IDE as shown below:


Tuesday, June 24, 2014

Learning Selenium WebDriver


Selenium IDE Introduction

Selenium IDE (Integrated Development Environment) is a tool that we can use to develop automated test scripts. It has record-and-playback functionality, but we can also write the test scripts ourselves by manually entering the commands. It comes with a browser context menu with the most frequently used Selenium commands. It saves test execution time and is a good way to get familiar with test automation.

Further references

All the Selenium IDE commands are explained on the following location: http://release.seleniumhq.org/selenium-core/1.0.1/reference.html

Using Selenium IDE for the first time

Selenium IDE comes as a Firefox plug-in and has an easy-to-use user interface. Although the interface is very intuitive the most frequently used parts are explained in this section.

Prerequisites

As we are going to use Selenium IDE for the first time, the first thing we have to do is to make sure that Firefox and Selenium IDE are installed properly.
  1. Go to http://getfirefox.com and install Firefox.
  2. Go to http://seleniumhq.org/download/ in the Firefox browser and install Selenium IDE.
  3. Restart Firefox if requested.

In practice

We can now open Selenium IDE by using the following actions:
  1. Open Firefox
  2. Open Selenium IDE, via the Tools menu.
SeleniumIDE_edit
We just opened Selenium IDE and we can start recording test scripts by default..

There is more…

Selenium IDE is divided into sections which are numbered in the previous screenshot. Each section is explained below:
  1. Menubar
    The menubar has options to add, open and save test scripts and test suites. It also has some general edit options and it is even possible to specify a preferred programming language.
  2. Base URL
    Allows test scripts to be run across different domains.
  3. Toolbar
    The buttons in the toolbar are used to control the test scripts. Each button is explained below (starting from the left):
    • Speed Control: Controls how fast your test script runs.
    • Run All: Run all test scripts in Selenium IDE.
    • Run: Run a single test script in Selenium IDE.
    • Pause/Resume: Pause a running test script.
    • Step: Step through the test script once it has been paused.
    • Apply Rollup Rules: This allows us to group a sequence of actions into a single action.
    • Record: The record button. It will be enabled when Selenium IDE is recording.
  4. test script pane
    The test script commands are displayed in the test script pane. There is one tab which shows us the script in the three-column table format. The other tab shows us the script in a preferred language.
    The Command, Target and value textfields are corresponding to the three-column table structure. It is possible to edit the values by clicking on a specific row. Those three fields are explained below:
    • Command: This select box has a list of all the Selenium commands. It is possible to type into it to use the auto complete functionality or use it as a dropdown. Some reference information is shown in the reference pane at the bottom once a specific action is selected.
    • Action: The first parameter specified for a command in the Reference tab of the bottom pane always goes in the Target field.
    • Value: If a second parameter is specified by the Reference tab, it always goes in the Value field.
  5. Test suite pane
    Shows the test scripts in the current test-suite along with the results.
  6. Log/Reference pane
    The bottom pane is used for four different functions divided in separate tabs, like: Log, Reference, UI-Element, and Rollup information. Each function is explained below:
    • Log: Error messages and information messages are shown while the test is running.
    • Reference: Displays the documentation of the command actually selected.
    • UI-Element: Displays the UI-element mappings actually in use.
    • Rollup: Shows rollup rules.

Record a test script

In this tutorial we are going to record a test script with Selenium IDE.

Prerequisites

Ensure that the record button is enabled. Selenium IDE automatically opens in record mode, otherwise you need to click on the (red) record button in the right top corner.

In practice

  1. Open the website under test in the Firefox browser. In this case we will use: http://selenium.polteq.com/testshop/.
  2. Open Selenium IDE, via the Tools menu.
  3. Start recording by pressing the record button in the right top corner, if needed.
  4. Search for ‘iPod’ and click on the search button.
  5. Validate that the text ‘iPod shuffle’ is present in the search results list. We can do that by selecting the text and opening the context menu (right-click) and select assertText.
The test script will end up like this:
COMMAND

open
type

clickAndWait
assertText

Selenese test cases are HTML based, so do not forget to add the HTML extension once you save the test case.
We can change the Locator Builder settings in Options -> Options… -> Locator Builders tab. It’s a good practice to put CSS on top.

Modify a test script

In this tutorial we will modify a test script by adding some commands manually.

Prerequisites

We can use the test script created in the previous tutorial, but now we want to change the language without recording the test again.

In practice

  1. Open the previous recorded test script.
  2. Select the row where we want to put an extra command.
  3. Ensure that record mode is enabled.
  4. Click on a specific language.
  5. Disable record mode.
The test script will end up like this:
COMMAND

open
click
type

clickAndWait
assertText

We just added an extra command to our previous recorded test script.

Store information from the page

With Selenium IDE we can store data and use it later. There are a couple of actions to store data, like: store, storeValue, storeText.

In practice

We like to store the text from a specific link and print it to the log panel. Obviously you can also use the text (which is stored in a variable) in the next test step.
  1. Open the previously recorded test script.
  2. Select the last row.
  3. Insert two new rows by opening the context menu (right-click) and select Insert New Command
  4. Add a storeText command to store the text of a given element.
  5. Add a echo command to display the content of the variable in the log panel.
The test script will end up like this:
COMMAND

open
type

clickAndWait
storeText

echo
assertText

The output of the script above is: [info] echo: iPod shuffle
Selenium uses a JavaScript map called storedVars to store the data.

Dealing with AJAX functionality

Some websites are using AJAX to modify the graphical user interface (GUI) without being reloaded. In this tutorial we are going to record website functionality which is using AJAX. We can use waitFor commands, like: waitForAlertNotPresent, waitForAlertPresent, waitForElementPresent, waitForElementNotPresent, waitForTextPresent, etc.

In practice

  1. Open the website under test in the Firefox browser. In this case we will use: http://selenium.polteq.com/testshop/.
  2. Open Selenium IDE, via the Tools menu.
  3. Start recording by pressing the record button in the right top corner, if needed.
  4. Add a product to the cart by performing the following actions: navigate to the ‘laptop’ category, view an item and click on the ‘add to cart’ button.
  5. Verify that the product is added to the cart, by right clicking on the items name in the cart and select waitForText.
  6. Delete the item from the cart, by clicking on the remove icon next to the item name.
  7. Verify that the text ‘no product’ is present in the cart, we can do that by selecting the text and opening the context menu (right-click) and select waitForElementPresent.
  8. Stop recording by clicking on the record button and try to execute the recorded test script by clicking on the play button.
The test script will end up like this:
COMMAND

open
clickAndWait
clickAndWait
click
waitForText

click
waitForElementPresent
Selenese test cases are HTML based, so do not forget to add the HTML extension once you save the test case.

Create test suites

A test suite is a collection of test scripts. In this tutorial we are going to take a closer look on how to create a test suite.

In practice

  1. Create a test script as described in the previous tutorials.
  2. Select File -> New Test Case to create a new test script. (or open the context menu from the left panel and select New Test Case)
  3. Repeat step 1 and 2 as many times you want.
  4. Select File -> Save Test Suite to save all test scripts.
Selenese test suites are HTML based, so do not forget to add the HTML extension once you save the test case.

Exexute test scripts in different browsers

In this tutorial we are going to execute test scripts in different browsers.

Prerequisites

It is necessary to download the Selenium standalone server, IEDriverServer and chromedriver. (http://code.google.com/p/selenium/downloads/list)

In practice

  1. We need to start Selenium standalone server by entering the following command in the commandline:
    1
    2
    3
    java -jar selenium-server-standalone-2.39.0.jar 
    -Dwebdriver.ie.driver=IEDriverServer.exe 
    -Dwebdriver.chrome.driver=chromedriver.exe`
    
  2. We need to enable WebDriver Playback in Selenium IDE. Options -> Options... -> WebDriver tab and check Enable WebDriver Playback
  3. Specify in which browser we like to run our test scripts Options -> Options... -> WebDriver tab and specify the browser in the textfield. (chrome, firefox, internet explorer and so on)
Now you can run your test script with WebDriver in the specified browser.
- See more at: http://selenium.polteq.com/en/category/01-selenium-ide/#sthash.DtgxDgq3.dpuf